Session 2 : Xamarin Forms Rich UI Controls
Hi Guys, This is our 8th Meetup of Colombo Xamarin Meetup group. I’m happy to say you that we have successfully done our meetup on 29th June 2017 in CMS , Colombo with two sessions.
I have done the 2nd session about Xamarin Forms Rich User interface controls with a demo and this article is about my session.
https://www.meetup.com/Colombo-Xamarin-Meetup/events/241017250/

Image 1 : Colombo Xamarin Meetup
Click below link to Download the Slide of Session 2 –
[Xamarin forms Rich UI Controls] : Meetup20170629.Buddhima.ppt
You can have the sample App here…
https://drive.google.com/open?id=0B2gY_8MAQPWnQnZERi03Y0hENk0
What are the the rich UI controls available for Xamarin forms ?
I found some third party controls which are available for xamarin forms and xamarin native development and here are some main providers and their controls…

Image 2 : Rich UI control providers
Syncfusion – https://www.syncfusion.com/products/xamarin
Infragistics – https://www.infragistics.com/products/xamarin
Telerik – http://www.telerik.com/xamarin-ui
DevExpress – https://www.devexpress.com/products/xamarin/
First of All you should have a idea about Layouts, Pages, Views and Controls in Xamain Forms Mobile applications..
So Please Use these reference to learn them…
https://developer.xamarin.com/guides/xamarin-forms/user-interface/controls/pages/
https://developer.xamarin.com/guides/xamarin-forms/user-interface/controls/layouts/
How to Design the User Interface(UI) in Xamarin Forms ?
There are two main methods :
- Design using XAML (Extensible Application Markup Language)
- using C# code in code behind
but you can design the UI using both of them…
What’s going to do ?
Syncfusion is better to develop Xamarin apps because of …

- It gives a community license
- and It has large number of controls than other third-party control providers.
- Its very flexible to use
- Good customer support etc.
How to Get the Free Community License ?
To get the community licence, go to..
https://www.syncfusion.com/products/xamarin
https://www.syncfusion.com/products/communitylicense
When you claim the license by registering with syncfusion , they will send you the licence code for the product and you have to use it in the installation of the package…
How to Get the Syncfusion Packages to the Application ?
There are two methods to get the packages..
- Get using NuGet
- Direct Download using web site
You can follow the user guide to see how to download and Install the package in both of above methods..
Click here to see the user guide for download and installation …
https://help.syncfusion.com/xamarin/introduction/download-and-installation
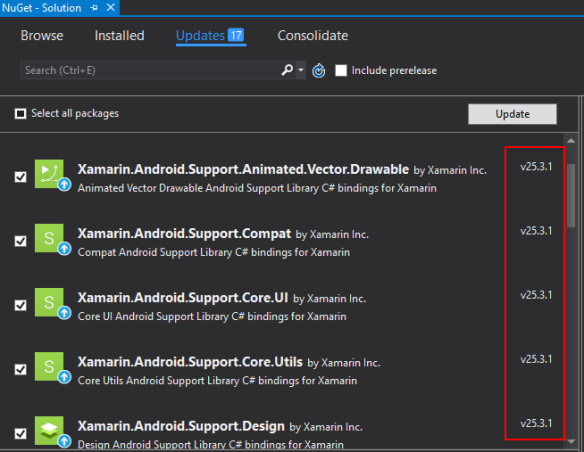
How to Download Syncfusion Xamarin from Nu Get ?
In Visual Studio go to …
- Tools -> Options -> NuGet Package Manager -> Package Sources. By default You can see default NuGet packages are there.

Image 3 : Add new packages to NuGet Gallery
- To Add Syncfusion packages, Click Add Button in the top Right side..
- Then Copy and paste below URL in the bottom of the window like following image..
http://nuget.syncfusion.com/nuget_xamarin/nuget/getsyncfusionpackages/xamarin
When you add the name and source, Click “Update” and then Click “OK”

Image 4 : Add Syncfusion Packages to NuGet Gallery
Now you can search the Syncfusion controls in the NuGet Package manager in Visual Studio..
Now right Click on the Solution -> Manage NuGet Packages for Solution -> you will see the Package Manager dialogue like below and you will see the Syncfusion packages has been added in package sources drop down list..

Image 5 : Select Syncfusion Packages
Click on Syncfusion Packages and then the syncfusion packages will be loaded to the list.

Image 6 : Search NuGet packages
Syncfusion Controls for Xamarin
There are many useful controls for Xamarin has been provided by Syncfusion and I have added them to my power point Slide and please see to to get them..
You can see them here in their website..
https://www.syncfusion.com/products/xamarin/chart
and their user guide..
https://help.syncfusion.com/xamarin/sfbusyindicator/animationtype
How to Manage References/Dependencies of Controls in a Xamarin Forms App ?
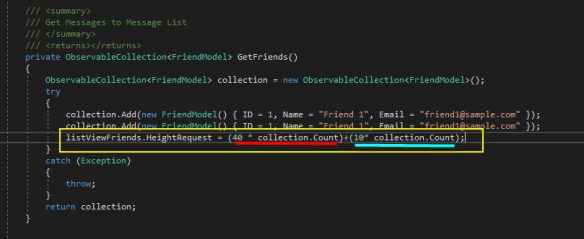
Here I have taken he dependencies for Syncfusion chart to explain how the dependencies need to be added to the solution.

Image 7 : Dependencies
I have highlighted Syncfusion.SfChart.XForms.dll in Green color here and It has been added to all projects in the solution. The reason is the dll contains the common xamarin forms features and behaviors of Chart controls for all projects. So it should be added to all.
And in Yellow color, I have highlighted the platform specific dll(class library) files that we have to be added to native projects.
The best practice is follow the Syncfusion user guide when adding dependencies to any of their controls.
You can have the List of dependencies here…
https://help.syncfusion.com/xamarin/introduction/control-dependencies
You have to take care of dependencies when you are adding the references manually to your projects.
But when you are adding any controls from NuGet, it automatically installed the necessary dependencies itself.
Lets Develop a Demo App
In the session I did show you how to add Syncfusion Auto Complete Control and how to customize it.
Now lets do from the scratch.. !
Lets add dependencies to the project..
I’m using Visual Studio 2017 for the demo and OS is Windows 10.
Open Visual Studio and Go to File -> New -> New Project
Select Cross-platform in the right side of the window and select Cross Platform app (Xamarin) in Left side which shows project templates..
Then Give a Name to the app. I’ll give “DemoApp” as the Name. and Click “OK”

Image 8 : Select Project type to create
Now you will see another window to Select the Project Template, UI technology and code sharing strategy.
I’ll select Blank app as Template, Xamarin forms as UI technology and PCL(Portable class library) as code sharing technology for my demo.

Image 9 : Select Template
Now the project will be created and you will see it like below… The project consists of PCL, Android, iOS and a UWP project.
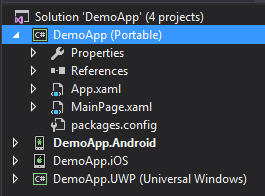
Image 10 : Created Solution with projects
Then I’ll add here three folders to separate Models, View Models and Views and then the project will be like below.

Image 11 : Model, View and ViewModel folders Create
Now Lets Install the dependencies for Syncfusion Auto Complete Control (SfAutoComplete).
SfAutoComplete is a control just like a Combo box that we use in Windows and web application.
Syncfusion Auto Complete for Xamarin.Forms provides a simpler way to complete the text based on the letters that the we entered on the box. It also provides option to choose a suggestion from drop down or append a suggestion to the text directly.
For more info, Go to …
https://help.syncfusion.com/xamarin/sfautocomplete/overview
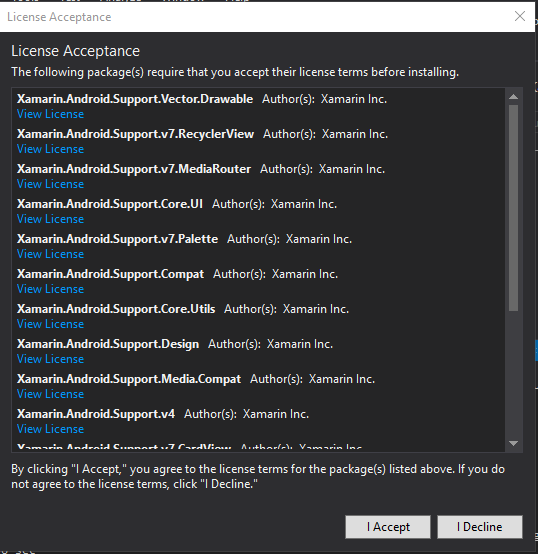
Install using NuGet
Right Click on the Solution and -> Manage NuGet Packages
Then Select the SfAutoComplete control, Add it to all project by check the check boxes in the right side of the window.
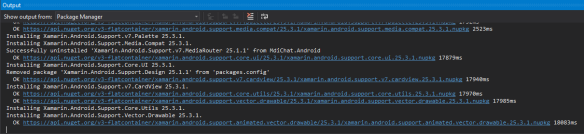
And then Click install… And follow below steps to add the package…

Image 12 : Add SfAutoComplete from NuGet

Image 13 : Conform install the package

Image 14 : Accept licence
Now you can see the SfAutoComplete libraries has been added to the projects inside the solution..
I’m going to create a Android application and so I’ll show here how the references has been added to PCL and Android projects..
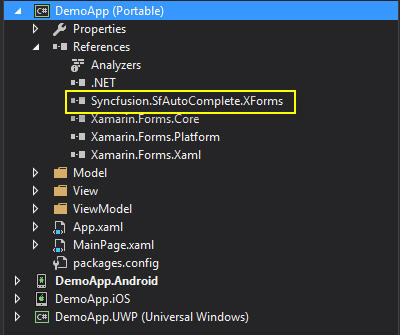
Image 15 : SfAutoComplete reference has been added to PCL

Image 16 : SfAutoComplete references has been added to Android
Now, Lets Start Coding…
Create Model
First I’ll create a Model inside of the Model Folder which “Student”..
namespace DemoApp.Model
{
public class Student
{
private int id;
public int ID
{
get { return id; }
set { id = value; }
}
private string name;
public string Name
{
get { return name; }
set { name = value; }
}
private string image;
public string Image
{
get { return image; }
set { image = value; }
}
}
}
Create View Model
And will Create A ViewModel inside the ViewModel folder as “StudentViewModel”. and I have created a Collection of Stundets in it as “StudentCollection”.
namespace DemoApp.ViewModel
{
public class StudentViewModel
{
private List<Student> studentCollection;
public List<Student> StudentCollection
{
get { return studentCollection; }
set { studentCollection = value; }
}

public StudentViewModel()
{
studentCollection = new List<Student>();
studentCollection.Add(new Student() { ID = 1, Name = "Buddhima", Image = "Student.png"});
studentCollection.Add(new Student() { ID = 2, Name = "Buddhika", Image = "Student.png"});
studentCollection.Add(new Student() { ID = 3, Name = "Dickson", Image = "Student.png" });
studentCollection.Add(new Student() { ID = 4, Name = "Janith", Image = "Student.png"});
studentCollection.Add(new Student() { ID = 5, Name = "Vidura", Image = "Student.png"});
studentCollection.Add(new Student() { ID = 6, Name = "Charitha", Image = "Student.png" });
studentCollection.Add(new Student() { ID = 7, Name = "Vimukthi", Image = "Student.png"});
studentCollection.Add(new Student() { ID = 8, Name = "Buddhi", Image = "Student.png"});
studentCollection.Add(new Student() { ID = 9, Name = "Buwaneka", Image = "Student.png"});
}
}
}
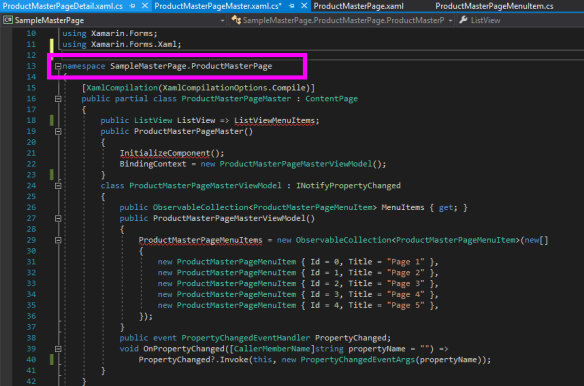
in the above code you can see there is a property called “Image” which is a image to show the student. So I have added an Image in the Android project.
To add Images we have to go to Resources folder in Android project and there are separate folders to add images for different dimensions of devices which are drawable, drawable-hdpi, drawable-xhdpi, drawable-xxhdpi. The image has to be added to all folders according to compatible sizes with the same name.

Image 17 : Add Images
Design the View/User Interface
Right Click on Views folder and Click Add..
Select Xamarin forms -> and Content page as template -> Give a name -> Click OK

Image 18 : Add a View
Then the View will be added inside of the folder with its default template with a XAML UI and a C# code behind class. (StudentView.xaml and StudentView.xaml.cs).
StudentView.xaml may be like below code…
<?xml version="1.0" encoding="utf-8" ?>
<ContentPage xmlns="http://xamarin.com/schemas/2014/forms" xmlns:x="http://schemas.microsoft.com/winfx/2009/xaml" x:Class="DemoApp.View.StudentView">
<ContentPage.Content>
<StackLayout>
<Label Text="Welcome to Xamarin Forms!" />
</StackLayout>
</ContentPage.Content>
</ContentPage>
StudentView.xaml.cs may be like below code…
using Xamarin.Forms;
using Xamarin.Forms.Xaml;

namespace DemoApp.View
{
[XamlCompilation(XamlCompilationOptions.Compile)]
public partial class StudentView : ContentPage
{
public StudentView()
{
InitializeComponent();
}
}
}
[XamlCompilation(XamlCompilationOptions.Compile)] annotation use to increase the performance of the UI in compiling which has been designed using XAML.
Now lets add the SfAutoComple to the View.
To Add any third-party Control to the XAML UI, we have to add its namespace into the Header of the Page.
So, I’ll add the namespace of SfAutoComplete to the header of the Content Page.
xmlns:autocomplete=”clr-namespace:Syncfusion.SfAutoComplete.XForms;
assembly=Syncfusion.SfAutoComplete.XForms”
And I’ll add the control inside a Stack layout.. The design of the view should be add inside the tag.
We can call the control by the namespace that we have added to the page header and here you can see how we can call the SfAutoComplete control.
<autocomplete:SfAutoComplete>
</autocomplete:SfAutoComplete>
And then the Code of the view like below. You can see a label also inside the Stack layout which has added when create the form.
<?xml version="1.0" encoding="utf-8" ?>
<ContentPage xmlns="http://xamarin.com/schemas/2014/forms" xmlns:x="http://schemas.microsoft.com/winfx/2009/xaml" xmlns:autocomplete="clr-namespace:Syncfusion.SfAutoComplete.XForms; assembly=Syncfusion.SfAutoComplete.XForms" x:Class="DemoApp.View.StudentView">
<ContentPage.Content>
<StackLayout>
<Label Text="Auto Complete control" />
<autocomplete:SfAutoComplete>
</autocomplete:SfAutoComplete>
</StackLayout>
</ContentPage.Content>
</ContentPage>
Then Lets Bind Data to the SfAutoComplete control
I’m going to bind Student Collection as data to the control using MVVM pattern. and there are two ways to Bind data using MVVM (Model View ViewModel).
- using XAML
- using C# in code behind
SfAutoComplete Control allow us to Bind a List of Strings or a List of Business Objects as the DataSource. In this Example I’m binding a List of Students to the control.
To learn more about MVVM in Xamain Please follow these links..
https://developer.xamarin.com/guides/xamarin-forms/creating-mobile-apps-xamarin-forms/summaries/chapter18/
https://developer.xamarin.com/guides/xamarin-forms/xaml/xaml-basics/data_bindings_to_mvvm/
In this example, I’ll bind data using XAML. And will set the Binding context to the View using code behind.
Now I’mm Bind the Student View Model to the StudentView Page. We have to set the binding context inside the constructor of the view page.
[XamlCompilation(XamlCompilationOptions.Compile)]
public partial class StudentView : ContentPage
{
public StudentView()
{
InitializeComponent();
this.BindingContext = new ViewModel.StudentViewModel();
}
}
And then need to Bind the DataSource to the SfAutoComplete Control. In XAML page, bind StudentCollection List in the StudentVoewModel to the DataSource Property as below.
<autocomplete:SfAutoComplete DataSource="{Binding StudentCollection}">
</autocomplete:SfAutoComplete>
Set the Student View Startup page …
Set the main page to StudentView in App.xaml.cs in PCL project..
public App()
{
InitializeComponent();

MainPage = new DemoApp.View.StudentView();
}
But when you run the android app, it will not show the data inside of the control.
The reason is you haven’t bind the display value to it.
Then Lest set the additional attributes..
Now we can set which value can be show inside the Control and what will be the Selected Value of the control.
DisplayMemberPath – What should me the display member
SelectedValuePath – what should be the selected value
<autocomplete:SfAutoComplete DataSource="{Binding StudentCollection}" DisplayMemberPath="Name" SelectedValuePath="ID">
</autocomplete:SfAutoComplete>
Lets compile and run the app and it will show the list of students when searching.. By default it suggest data by the starting characters that we are typing.
Image

Image 18 : Simple SfAutoComplete with Data Binding
So, we have to set the Suggestion mode too. And also we can set the Autocomplete Mode too.
Lets Do it ..
There are 8 main suggestion modes and I’ll select “StartsWith”

Image 19 : Suggestion modes in SfAutoComplete
There are 3 Auto Complete modes and I’ll select “Suggest”.

Image 20 : Auto Complete modes in SfAutoComplete
Now Lets Customize the AutoComplete control..
now I want to show Student’s image, Name inside the control when searching..
So, I’ll add a data template to the AutoComplete control now.
to do it, we can use the autocomplete:SfAutoComplete.ItemTemplate tag. and we can and we can design the template inside it. in this example I’ll use a Grid View to design the template and below you can see the code. Also I have bind data to the controls which are in the grid.
<StackLayout>
<Label Text="Welcome to Xamarin Forms!" />
<autocomplete:SfAutoComplete DataSource="{Binding StudentCollection}" DisplayMemberPath="Name" SelectedValuePath="ID" SuggestionMode="StartsWith" AutoCompleteMode="Suggest" >
<autocomplete:SfAutoComplete.ItemTemplate>
<DataTemplate>
<Grid>
<Grid.RowDefinitions>
<RowDefinition Height="Auto"/>
</Grid.RowDefinitions>
<Grid.ColumnDefinitions>
<ColumnDefinition Width="Auto"/>
<ColumnDefinition Width="*"/>
</Grid.ColumnDefinitions>
<Image Grid.Row="0" Grid.Column="0" Source="{Binding Image}" WidthRequest="30" VerticalOptions="FillAndExpand"/>
<Label Grid.Row="0" Grid.Column="1" Text="{Binding Name}" HorizontalOptions="FillAndExpand"/>
</Grid>
</DataTemplate>
</autocomplete:SfAutoComplete.ItemTemplate>
</autocomplete:SfAutoComplete>
</StackLayout>
Lets Run the app…

Image 21 : Customized SfAutoComplete
It runs successfully…
For more details about SfAutoComplete control please go to this link and you will be able to learn more about it… Including events, Customize the design etc…
https://help.syncfusion.com/xamarin/sfautocomplete/overview
You can have the sample App here…
https://drive.google.com/open?id=0B2gY_8MAQPWnQnZERi03Y0hENk0
References
https://help.syncfusion.com/xamarin/introduction/overview
Thank you !